How to Grow a Green Ash Tree from Seeds Successfully
I’ve always been drawn to the idea of growing trees from scratch. There’s something really satisfying about taking a tiny seed and watching it turn into a strong, mature tree. Ash trees, in particular, seem like a good choice for my yard – they’re tough and look nice. So, I decided to figure out how to grow green ash tree seeds myself. It turns out, it’s not as complicated as I first thought. This guide is what I’ve learned along the way, covering everything from finding the seeds to giving the little sprouts the best chance to grow.
Understanding Green Ash Tree Seeds: Characteristics and Viability
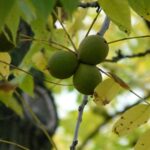
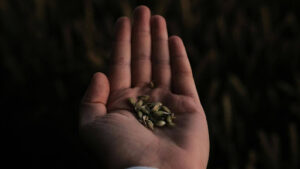
When I first thought about growing a green ash tree from seed, I wasn’t sure what to expect. Ash seeds, technically called samaras, are interesting. They have this little wing attached, which is basically nature’s way of helping them travel on the wind to find new places to grow. It’s a clever design, really. These seeds are the starting point for what can become a really substantial tree, offering shade and a home for wildlife.
It’s important to know that not all seeds you find will be good for planting. Viability is a big word here, and it just means whether the seed is alive and capable of sprouting. Several things can affect this. For starters, how mature was the seed when it was collected? Was it damaged by insects or disease? Even though it was stored before you got it, it can make a difference. I’ve learned that gathering more seeds than I think I’ll need is a good strategy, just to increase my chances of getting some viable ones.
Here’s a quick look at what makes a good ash seed:
- Appearance: Look for seeds that are plump and well-formed. Avoid any that look shriveled, discolored, or have any signs of mold or damage.
- Maturity: Seeds collected after they’ve naturally fallen from the tree in the fall are usually the most mature and viable.
- Handling: Proper handling and storage are key. If seeds are exposed to extreme heat or moisture before you get them, their viability can drop significantly.
The natural process for ash seeds involves a period of dormancy that needs to be broken before they can sprout. This often means they need to experience a cycle of cold and then warmth, mimicking natural seasonal changes. Without this, even a perfectly healthy seed might just sit there, doing nothing.
Getting seeds from a healthy parent tree is also a good start. If you’re collecting them yourself, try to find trees that look strong and disease-free. This gives the seeds the best possible start. Remember, patience is really important when you’re working with ash seeds; they have their own timeline for germination, and it’s not always quick. Learning about the specific needs of ash seeds will really help set you up for success.
When and How to Collect Green Ash Tree Seeds
Timing is really important when you’re trying to get green ash tree seeds to grow. If you collect them too early or too late, they might not be viable. I’ve found that the sweet spot for collecting these seeds is generally from late summer through early fall. Think August to October, depending on where you live and what the weather’s been like.
How do you know when they’re ready? Look for the seeds to change color. They start green, but as they mature, they’ll turn a golden-brown. That’s usually a good sign they’re ready to harvest. You might also notice them starting to dry out and detach from the tree, sometimes falling to the ground in little clusters. If you see them falling, that’s your cue to start gathering.
When it comes to actually collecting them, it’s straightforward. You don’t need a lot of fancy gear, but a bucket or a large cloth can be helpful to catch the seeds if you’re shaking branches. If the seeds are way up high, a sturdy ladder is a good idea, but always be safe. I usually try to collect on a dry, calm day. Windy days can make the seeds scatter, and wet days just make everything a bit more difficult.
Here’s a quick rundown of what I do:
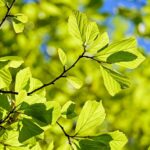
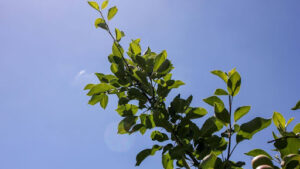
- Locate the trees: First, I make sure I’m looking at an actual ash tree. They usually have compound leaves with several leaflets and bark that looks a bit like diamonds.
- Check the seeds: I look for those golden-brown, winged samaras that are starting to detach.
- Gather gently: I either collect them from the ground right after they fall or gently shake branches to get them to drop into my bucket. Sometimes, I can just pick them right off the tree if they’re easy to reach.
- Clean them up: Once I have a good collection, I spread them out on a flat surface to get rid of any leaves or twigs mixed in. This helps ensure I’m only storing the good seeds.
It’s best to gather your green ash tree seeds when they are mature and have started to dry. This usually happens in the fall, and collecting them on a clear, calm day makes the process much easier and more successful.
If you’re not sure about identifying ash trees, checking out resources on local tree species can be really helpful. Getting the timing and collection method right is the first big step to growing your own green ash tree from seed.
Storing and Handling Green Ash Tree Seeds Before Planting
Once I’ve collected and cleaned my green ash seeds, the next step is making sure they stay good until I’m ready to plant them. This part is pretty important, and honestly, it’s not too complicated if I get it right. Proper storage is key to keeping those seeds viable.
First off, I need to make sure the seeds are completely dry. Any leftover moisture can lead to mold or rot, which is the last thing I want. I usually spread them out on a clean paper towel or a tray in a spot with good air circulation for a day or two. I avoid direct sunlight during this drying phase.
After they’re dry, I put them into a container. A breathable option, like a paper bag or a small cloth sack, works well. I’ve read that plastic bags can trap moisture, so I steer clear of those. If I’m planning to stratify them soon, I can store them in the refrigerator. A good spot is a sealed container, maybe a glass jar with a lid, placed in the crisper drawer. This keeps them cool and dry, mimicking the conditions they’d experience naturally over winter.
Here’s a quick rundown of how I store them:
- Container Choice: Use breathable materials like paper bags or cloth sacks. Avoid plastic.
- Location: Store in a cool, dry place. The refrigerator is ideal if stratification is planned.
- Labeling: If I collect seeds from different ash species or at different times, I make sure to label each container clearly. This helps avoid mix-ups later on.
Keeping seeds in a cool, dry environment helps them maintain their ability to sprout. It’s like putting them in a state of suspended animation until the right conditions come along.
If I’m not going to stratify them right away, I can keep them in a cool basement or an unheated garage, as long as it stays dry. The main goal is to prevent them from drying out too much or getting too wet. For longer-term storage, the refrigerator is usually the best bet. I’ve found that keeping them at around 40 degrees Fahrenheit for a month or two can really help them sprout more quickly when the time comes, which is why I check out resources on seed storage to make sure I’m doing it right.
Pre-Treatment of Green Ash Tree Seeds: Stratification & Soaking
Before I even think about putting ash seeds in the ground, I know they often need a little nudge to get going. This is where pre-treatment comes in, mainly through something called stratification and sometimes soaking. It sounds fancy, but it’s really just about mimicking what happens to seeds naturally over winter.
Green ash seeds need a period of cold, moist conditions to break dormancy and prepare for germination. Without this, they might just sit there, refusing to sprout or take ages to do so. It’s like they’re waiting for spring to officially arrive before they’ll even consider waking up.
For stratification, I usually grab a damp paper towel – not soaking wet, just moist. Then, I tuck the seeds inside, fold the towel over them, and pop the whole thing into a plastic bag or a container with a lid. This needs to go into the refrigerator. I aim for about 30 to 60 days in there. It’s important to check on them periodically, maybe once a week, just to make sure the paper towel is still damp and that no mold has decided to move in. If it looks dry, I’ll lightly mist it.
Sometimes, especially if the seed coat feels really hard, a soak can help too. I’ll put the seeds in a cup of water, but not boiling water – just warm tap water is fine. I let them sit in there for about 24 hours. If they don’t seem to have swollen up much, I might try another 24-hour soak. This helps soften that outer shell so moisture can get in more easily.
It’s really about giving the seeds a head start, simulating the natural cycle they’d go through if they fell to the ground in autumn and waited through winter. This process helps them understand that it’s time to grow when the conditions are right.
After stratification, or soaking, I’ll usually drain any excess water and let them air dry for a bit before planting. This prevents them from getting too soggy right before they go into the soil.
Preparing the Soil & Site for Sowing Green Ash Tree Seeds
Before I even think about putting seeds in the ground, I need to get the spot ready. Picking the right place is pretty important for these trees. Ash trees really like sunshine, so I’m looking for a location that gets at least six to eight hours of direct sunlight every day. Whether I’m planting in a pot or directly in the yard, the sun is key. I also need to remember that these trees get big, so I’m making sure there’s plenty of room for them to spread out later on, away from buildings or other plants that might get crowded.
When I’m planting directly into the ground, I’ll loosen up the soil first. This helps the seeds get a good start. I’ll also pull out any weeds that are already there. Ash trees aren’t too picky about soil, but they do best in soil that’s a bit on the acidic side or neutral. If I’m not sure about my soil, I might test its pH level. For pots, I’ll use a potting mix that drains well. Heavy soil that stays too wet isn’t good for ash seeds; they like it moist, but not soggy.
Here’s a quick rundown of what I’m looking for in a planting spot:
- Sunlight: At least 6-8 hours of direct sun daily.
- Space: Room for the tree to grow tall and wide.
- Soil Drainage: Soil that doesn’t hold too much water.
Getting the soil and site prepared properly is a step I don’t skip. It really makes a difference in how well the seeds do later on.
Sowing Green Ash Tree Seeds: Depth, Spacing, & Best Practices
Alright, so you’ve got your ash seeds prepped and ready to go. Now comes the fun part: getting them into the soil. It’s not super complicated, but a few things can make a big difference in whether you end up with a healthy little tree or just… dirt.
First off, where are you planting? If you’re going straight into the ground, pick a spot that gets a good amount of sun, like at least six to eight hours a day. Ash trees aren’t shy about needing light. Also, think about how big these trees get. They can spread out quite a bit, so don’t plant them right up against your house or other plants. Give them some breathing room.
When you’re actually putting the seeds in, aim for about an inch deep. You can use a trowel or even just your finger. Just cover them up gently with soil. If you’re planting a few seeds together, give them some space. For planting outdoors, spacing them about three to five feet apart is a good idea. This stops them from competing too much for light and nutrients later on.
If you’re starting them in pots, use a potting mix that drains well. Heavy soil that stays soggy is a no-go; it can make the seeds rot. You want something light and airy that holds some moisture but lets the extra water escape. Again, plant the seeds about an inch deep and cover them up.
After planting, give them a good watering. You want the soil to be moist, but not like a swamp. Too much water can be just as bad as too little. A gentle watering can or even a spray bottle works well, so you don’t wash the seeds away.
Here’s a quick rundown:
- Depth: Plant seeds about 1 inch deep.
- Spacing (Outdoors): Give each seed or seedling 3-5 feet of space.
- Location: Choose a sunny spot with well-draining soil.
- Watering: Keep soil consistently moist, but not waterlogged.
Patience is really key here. Ash seeds can take a few weeks to sprout, sometimes even longer. Just keep the soil moist and the spot sunny, and try not to fuss over them too much. They’ll let you know when they’re ready to show themselves.
If you’re planting multiple seeds, it’s a good idea to label where you put them, especially if you’re trying different methods or have seeds from different trees. This way, you can track what works best for your situation.
Caring for Seedlings Grown from Green Ash Tree Seeds
Alright, so you’ve got your little green ash sprouts. Now comes the fun part: helping them grow into something substantial. It’s not rocket science, but you do need to pay attention to a few things.
First off, sunlight. These guys really like their sun, so aim for at least six to eight hours of direct light each day. If you’re growing them indoors, a sunny windowsill is good, but you might need a grow light, especially when the days get shorter. Just remember to rotate the pots so all sides get a fair share of the light.
Watering is another big one. You want the soil to be moist, but not a swamp. Soggy soil is a fast track to root rot, and nobody wants that. Check the soil daily, especially when it’s warm out. If the top inch feels dry, it’s time to water. Less water is needed when it’s cooler, but don’t let them dry out completely. Good drainage is key, whether they’re in pots or in the ground.
Airflow is surprisingly important. Too much dampness with no air movement can invite all sorts of fungal problems. Make sure your seedlings aren’t crammed together, and if they’re inside, keep them in a spot with decent ventilation.
Feeding them is usually something to think about after the first year. A balanced, slow-release fertilizer applied in early spring and again in late summer should do the trick. Don’t go overboard with the fertilizer, though; too much can actually hurt the roots.
Here’s a quick rundown of what to watch out for:
- Sunlight: At least 6-8 hours of direct sun daily.
- Water: Keep soil moist, not soggy. Ensure good drainage.
- Airflow: Prevent fungal issues with good ventilation.
- Fertilizer: Apply after the first year, sparingly.
- Pests: Check regularly and deal with them early. Insecticidal soap or neem oil can be helpful.
If you notice your seedlings getting tall and spindly, that’s usually a sign they need more light. On the flip side, if you see spots or wilting, it could be too much water or a fungal issue. Keep an eye on them, and you’ll get a feel for what they need. For more on the adaptability of these trees, you can check out the Green Ash tree information. Dealing with pests is also a common part of growing anything, and ash seedlings are no different. Keep an eye out for aphids or beetles. A gentle wash with water or some insecticidal soap usually sorts them out. If things get serious, neem oil is a good option. It’s all about observation and responding appropriately. With a bit of care, your seedlings will grow strong.
Transplanting & Long-Term Growth of Green Ash Trees from Seeds
So, you’ve nurtured your little ash seedlings, and now it’s time for them to move out of their starter pots and into a more permanent spot. This is a big step, and I’ve learned that doing it right makes all the difference. First off, I always make sure my seedlings are ready for the big move. This means they’ve developed a decent root system and are a good size, usually at least a foot tall. Before I even think about digging a hole, I start hardening them off. This is basically getting them used to the outside world gradually. I’ll put them out on the porch for a few hours each day, bringing them in at night, and slowly increase the time they spend outdoors over a week or two. This helps prevent transplant shock, which can really set them back.
When it comes to picking the final location, I look for a spot that gets plenty of sun – ash trees really do love their sunshine, at least six to eight hours a day is ideal. The soil needs to drain well, too. I’ve found that digging a hole about twice as wide as the seedling’s root ball and just as deep is a good rule of thumb. When I lift the seedling from its pot, I’m careful not to pull on the stem. Gently tipping the pot and supporting the base of the plant usually works best. If the roots are tightly wound, I’ll gently loosen them a bit with my fingers. Then, I place the seedling in the hole, making sure the top of the root ball is level with the surrounding soil. I fill the hole back in with soil, firming it gently around the base to get rid of air pockets.
Watering after transplanting is important, but I don’t want to drown them. I give them a good soak right after planting and then keep the soil consistently moist, but not soggy, for the first few weeks. As for feeding them, I usually wait until the second year. When I do fertilize, I use a balanced, slow-release type in early spring and again in late summer. I’m always careful not to overdo it, as that can actually harm the roots.
Patience is really the name of the game with growing trees from seed. It’s not a quick process, and you have to be prepared for the long haul. But seeing that little sprout turn into a sturdy tree over the years is incredibly rewarding.
Here’s a quick rundown of what I aim for in the first few years:
- Year 1: Focus on establishing a strong root system. Minimal pruning, just remove any dead or damaged branches. Keep the area around the base clear of weeds.
- Year 2: Begin light shaping if needed. Continue to monitor watering and fertilize as recommended.
- Year 3 onwards: The tree should be growing more vigorously. I’ll start thinking about the tree’s overall structure and prune to encourage good form. Regular watering is still important, especially during dry spells.
I also keep an eye out for any signs of pests or diseases. If I spot aphids, a good spray of water or some insecticidal soap usually does the trick. For fungal issues, good air circulation and avoiding overwatering are my first lines of defense. It’s all about giving them the best environment to grow strong and healthy for years to come.
Frequently Asked Questions
How do I know if my ash tree seeds are ready to be collected?
I look for seeds that have matured on the tree, which usually happens between September and December, depending on the specific type of ash tree. The seeds, which look like small winged pods called samaras, should be healthy and well-formed, without any signs of mold or damage. It’s best to gather more seeds than I think I’ll need, just in case some don’t sprout.
Why do ash tree seeds need cold stratification?
I understand that ash tree seeds need a period of cold treatment, called stratification, to break their natural dormancy. This process mimics the cold winter conditions they would experience in the wild, signaling them that it’s time to grow. Without this cold period, my seeds might not sprout, or they could take a very long time to do so.
How long does it typically take for ash tree seeds to sprout?
I’ve learned that patience is very important when growing ash trees from seed. It’s common for seeds to take anywhere from 2 to 4 weeks to sprout after planting, but sometimes they can take even longer. In some cases, seeds might not sprout until their second year, or even later, especially if the stratification process wasn’t perfect.
What should I do if my ash tree seedlings are growing tall and thin (leggy)?
If I notice my seedlings are becoming tall and thin with weak stems, it’s usually a sign that they aren’t getting enough light. Ash trees really thrive in full sunlight, so I make sure to move my seedlings to a spot where they can get at least 6 to 8 hours of direct sun each day. Using a grow light can also help if natural light is limited.
How often should I water my ash tree seedlings?
I aim to keep the soil for my ash tree seedlings consistently moist, but not soaking wet, as too much water can cause problems like root rot. I check the soil daily, especially when it’s warm. If the top inch of soil feels dry, it’s time to water. During cooler months, I reduce watering, but I always ensure the soil doesn’t dry out completely.
When is the best time to transplant ash tree seedlings into a larger pot or the ground?
I typically wait until my ash tree seedlings have developed a few sets of true leaves and are strong enough to handle the move. This is usually after their first year of growth. When transplanting, I make sure to choose a location with plenty of sunlight and well-draining soil, giving the young tree ample space to grow.
Request a Quote
Our Services